![]()
README
Marketing Cloud Learning Apps are free to use, but are not official Salesforce.com Marketing Cloud products, and should be considered community projects - these apps are not officially tested or documented. For help on any Marketing Cloud Learning App please consult the Salesforce message boards or the issues section of this repository - Salesforce.com Marketing Cloud support is not available for these applications.
About
This project provides a template for creating a mobile app (for iOS) that uses the Journey Builder for Apps SDK. It is also a UI for exploring its features and provides a mechanism to collect and send debugging information to learn about the workings of the SDK as you explore.
The code in this repository includes all of the code used to run the fully functional APK including an App ID and Access Token to let you test and debug the application. These keys will trigger an hourly automated push message of a timestamp, indicating that the application is properly setup. To create a new app the following keys must be set with your own values within the corresponding file.
AppDelegate+ETPushConstants.m
kETAppID_Prod: the App ID for your development app as defined in the App Center section of the Marketing Cloud.kETAccessToken_Prod: the Access Token for your development app as defined in the App Center section of the Marketing Cloud.
NB: You can use different keys for the staging/testing phase and the production phase. Staging/testing keys are called kETAppID_Debug and kETAccessToken_Debug.
Marketing Cloud App Center
App Center is the central development console for using Fuel’s APIs and building Marketing Cloud apps.
In order to connect your app to the Marketing Cloud, you must first create a MobilePush app in the App Center.
Each app in App Center represents an application connected to the Marketing Cloud. App Center currently manages four types of connected apps:
API Integration allows you to leverage the Marketing Cloud APIs. Create an API Integration app when you want to use Fuel APIs to automate tasks or integrate business systems. API Integration apps utilize an OAuth2 client credentials flow to acquire access tokens directly from the Fuel authentication service.
Marketing Cloud apps represent apps that live within the Salesforce Marketing Cloud and launch via the Marketing Cloud app menu. Marketing Cloud apps include custom apps built by your organization or apps installed from the Salesforce Marketing Cloud HubExchange. Marketing Cloud apps utilize a JSON Web Token (JWT) to acquire access tokens on behalf of logged in users.
Application Extensions allow you to extend the Marketing Cloud with custom Journey Builder activities, Cloud Editor Blocks, and Automation Studio activities.
MobilePush apps represent apps built for the iOS, Android, or Blackberry mobile platforms that use MobilePush to communicate with their users via push messages. The Salesforce Marketing Cloud classifies MobilePush apps as consumer-grade applications and utilize long-lived limited access tokens.
If you haven’t already, you should create an App Center account.
If you have an App Center account, you can log in to that account.
Push Notifications
MobilePush lets you create and send targeted push messages based on cross-channel consumer data to encourage app usage and deliver increased ROI. With MobilePush, you view how users navigate through your app and because MobilePush is built on the Salesforce Marketing Cloud, you can easily integrate push message campaigns with any email, SMS, or social campaigns.
Subscriber key
A subscriber is a person who has opted to receive communications from your organization.
A valid email address is required to receive emails and a phone number to receive SMS messages. Additional information about subscribers can be tracked using profile and preference attributes.
The Subscriber Key serves to identify your subscribers.
It can be set to a specific value provided by the subscriber such as a phone number, email address, or other appropriate value but most importantly a value that you choose.
For example, using a subscriber key to identify a subscriber with a value other than the email address would allow you to:
Maintain multiple sets of subscriber attributes for a single email address. For example, if a family shares an email address, you can use a subscriber key to uniquely identify each member of the family.
Include a single email address multiple times on a list. For example, if a message interaction sends a separate message for each car a subscriber owns, it may be appropriate for a single subscriber to receive multiple messages.
The Salesforce Marketing Cloud interface as well as the Web Service SOAP API support functionality around subscribers identified with a subscriber key.
Tags
Tags let you implement contact segmentation. You can set tags for subscriptions as defined by user choice. Additionally, use tags to collect information from the mobile app and for unstructured data or data that can contain many potential unknown values. For example, you can use tags when the number of potential attribute names exceeds the number of potential values of an individual attribute (such as the favorite brand specified by a contact).
Beacon and Geofence Messages
You can use the location capabilities of the JB4A SDK to target messages to a segmented group of contacts. Send personalized messages to increase engagement. The app pre-downloads geofence messages and triggers those messages when a mobile device crosses a geofence boundary. To use this functionality:
The account must have access to both MobilePush and Location Services.
Ensure that you use version 7.8.0 or earlier of Google Play Services to enable geolocation for your app.
You must receive user permission to implement location services.
Analytics
Mobile Application Analytics enables marketers to gather mobile app actions and behaviors from users and provides powerful visualizations of the data. The data helps you make informative decisions about how to structure your customer journeys, design your client facing experiences and tailor your digital marketing campaigns. The collected data is also available inside the Salesforce Marketing Cloud – ready to be used to segment messaging lists, provide highly personalized messaging content and drive 1:1 Custom Journeys.
After enabling the analytics feature in your app, visit the Web & Mobile Analytics application within the Marketing Cloud.
Implementation on iOS
Previous steps
iOS Provisioning Panel
Create your apps in the App Center
iOS Provisioning Panel
You must provision your mobile app in the iOS Provisioning Panel. The certificates issued in the process remain valid for one year. Ensure that you repeat this procedure once per year before your certificates expire to maintain app functionality. Follow the instructions below to integrate version 3.4.2 of the Journey Builder for Apps SDK with your iOS mobile app.
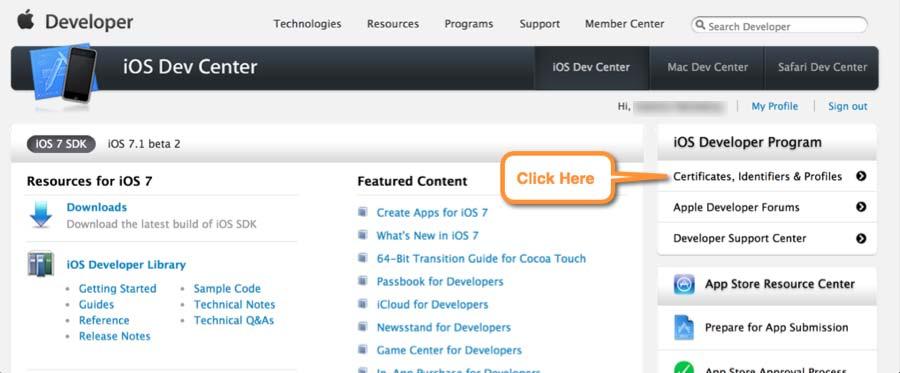
Log in at the iOS Dev Center.
-
Click Certificates, Identifiers & Profiles.
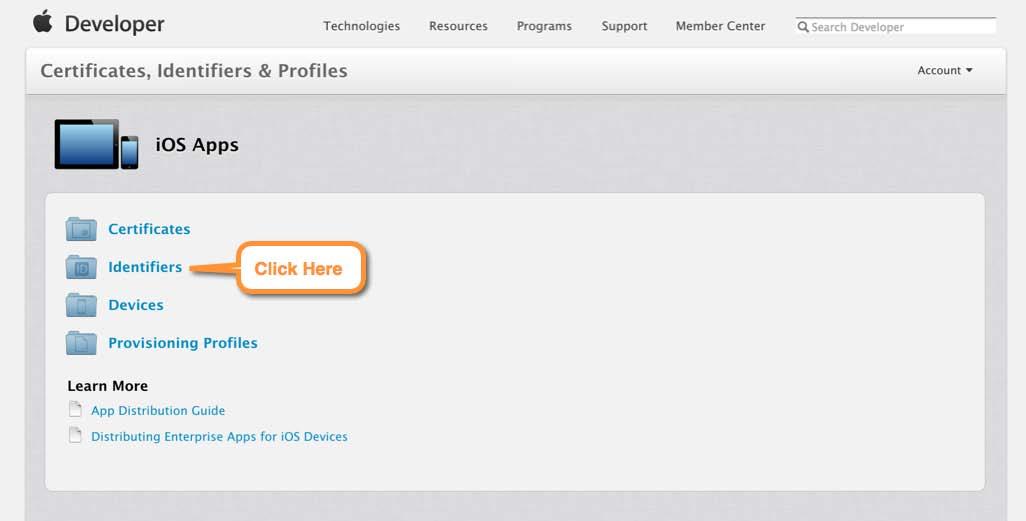
-
Click Identifiers.
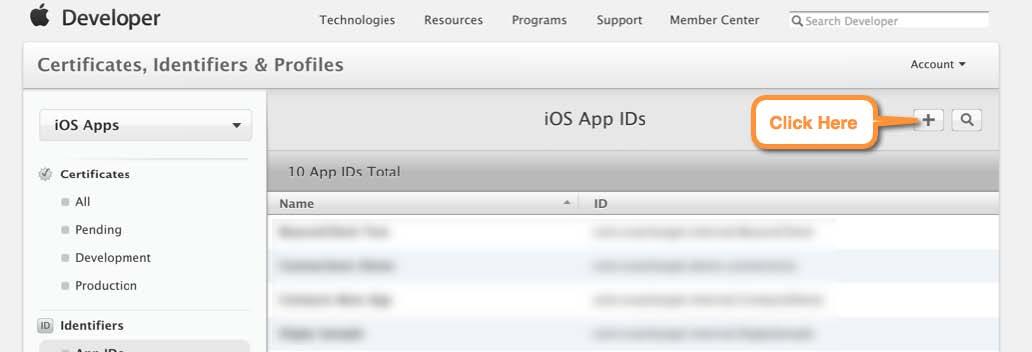
-
Click the + icon to create a new app.
-
Enter a name for the app in the Name text field.
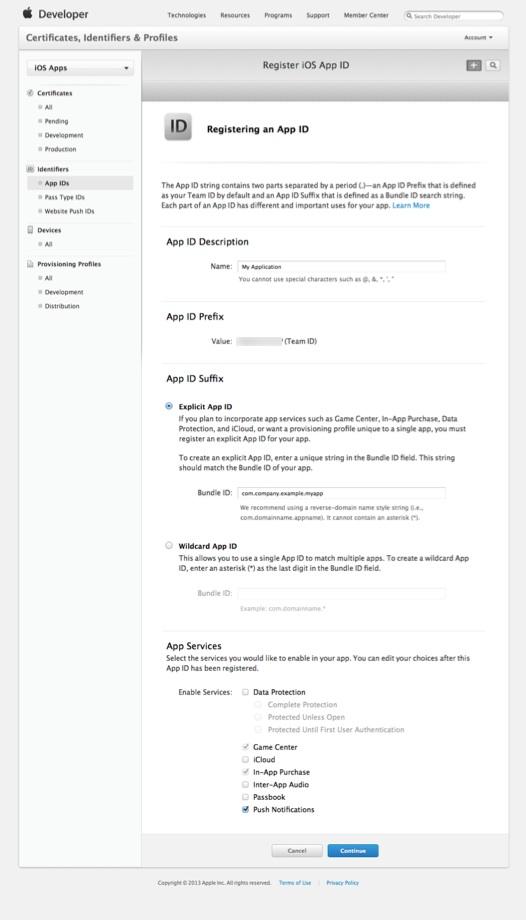
Enter an explicit app ID in the Bundle ID field.
Click the checkbox next to Push Notifications.
Click Continue.
Click Submit to confirm your app ID creation.
-
Select your app in the presented list.
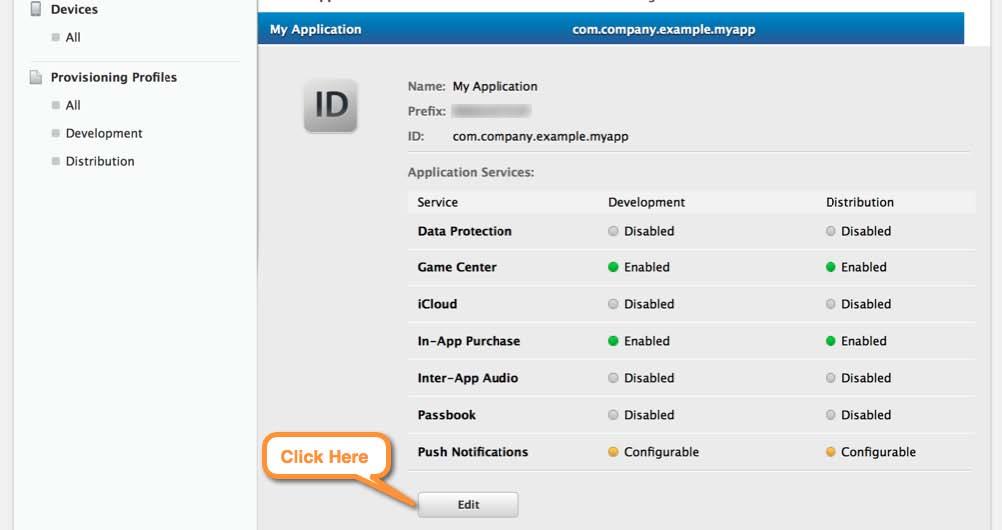
Click Edit.
-
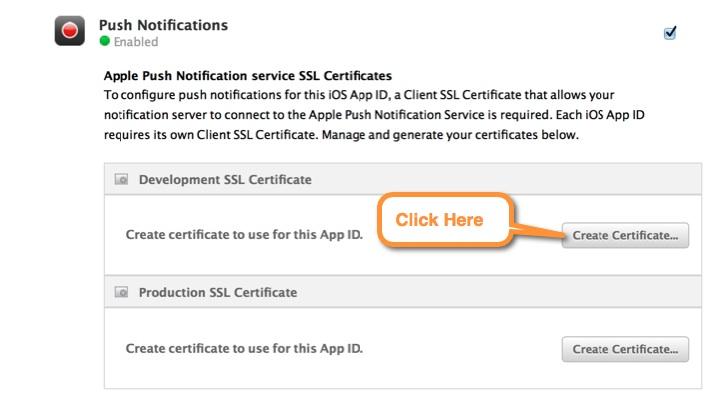
Click Create Certificate... under Development SSL Certificate or Production SSL Certificate depending on the instance of the app you provision. Note that you must repeat these steps for both the development and production instances of this app.
-
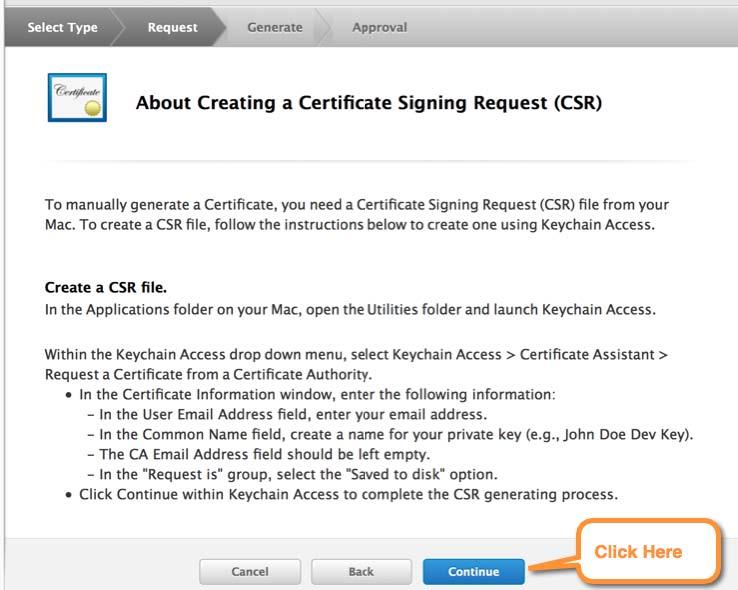
Launch Keychain Access on your Mac.
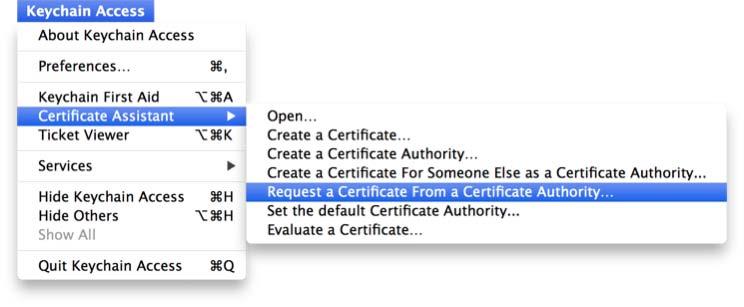
Click Keychain Access.
Click Certificate Assistant.
Click Request a Certificate from a Certificate Authority...
-
Enter your email address in the User Email Address field.
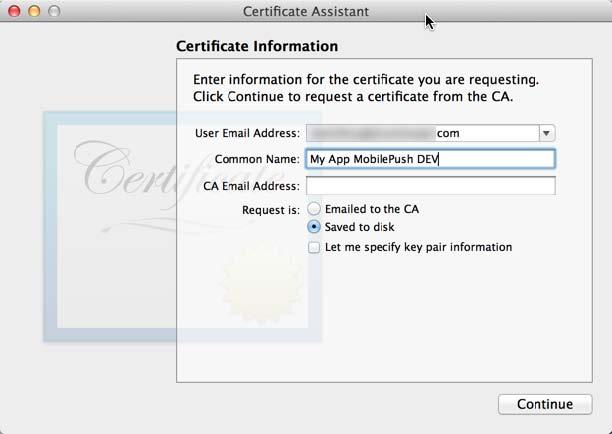
Enter a recognizable name for the certificate in the Common Name field.
Click Saved to disk.
Click Continue.
-
Enter a filename for the saved certificate.
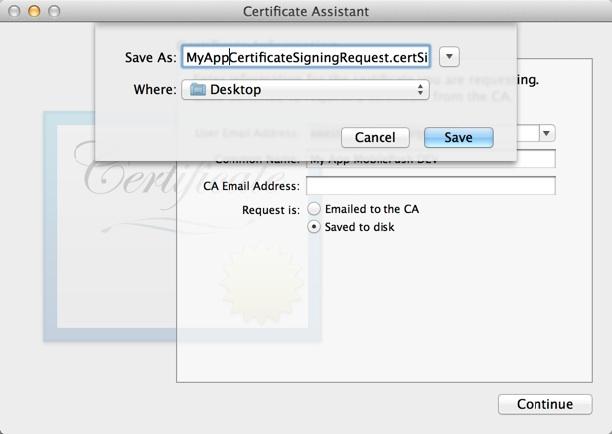
Choose a location at which to save the certificate.
Click Save.
Return to the iOS Dev Center website.
-
Click Continue.
Click Choose File.
-
Select the file saved in step 23.

Click Generate.
-
Click Download.
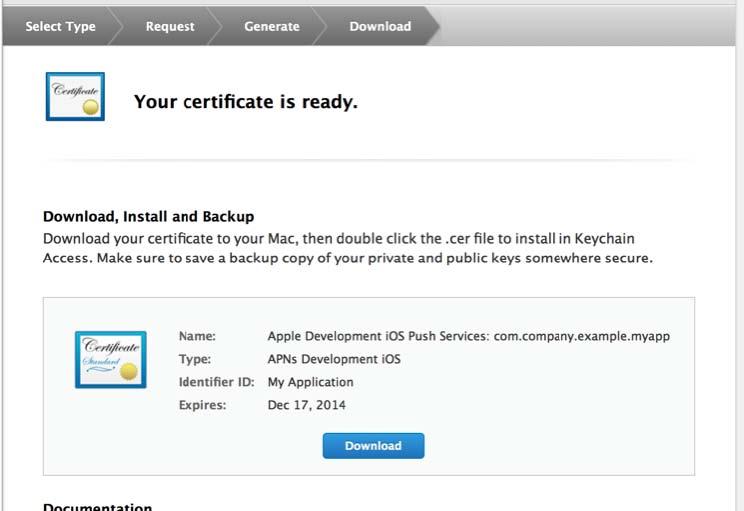
Double-click the downloaded file to install the certificate in Keychain Access.
-
Select the certificate in Keychain Access.

Right-click on the certificate.
Select Export. Ensure that you select only the certificate entry when exporting your certifications. Selecting multiple lines for export will cause an upload failure. Ensure you do not export the certificate as an embedded key.
Select a location to which to save the certificate.
Click Save.
-
Optionally, enter a password in the Password field.
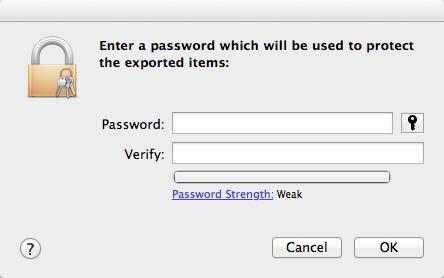
If you entered a password, enter that password again in the Verify field.
If you entered a password, Click OK.
Use the production and development certificates (the .p12 files) created in the previous steps along with the passwords to add to your MobilePush app in the the Create your apps in the App Center step.
Create your apps in the App Center
In order to connect your app to your Marketing Cloud account, you must follow these steps:
Add app to App Center.
Integrate the App Center app to your Marketing Cloud account.
Add the Provisioning info created in the iOS Dev Center to the app in the App Center.
Add app to App Center
To create a new MobilePush app:
Log in to the App Center (create an account if necessary).
-
Create a new app and select the MobilePush template
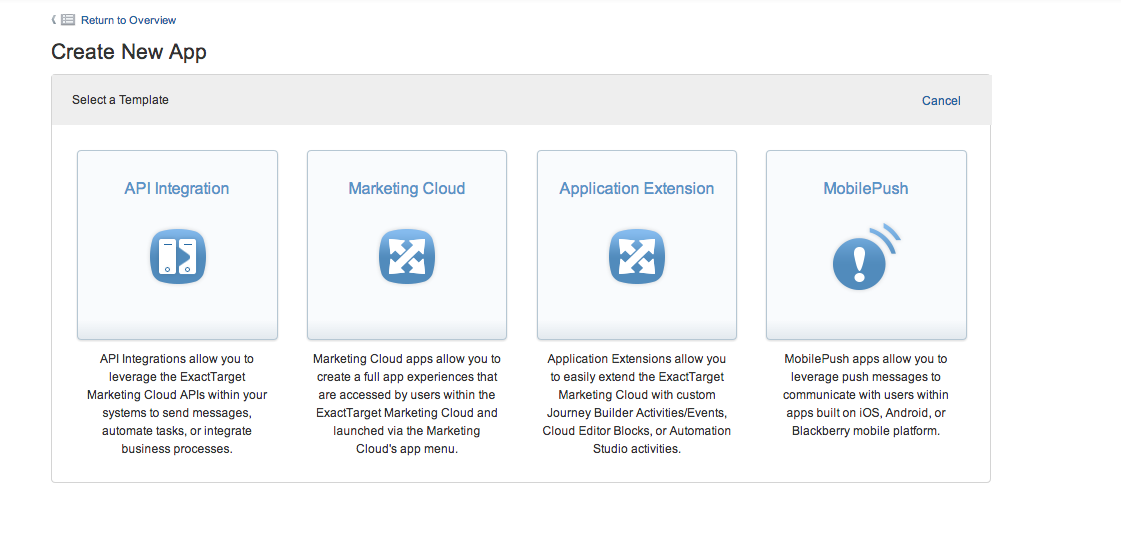
-
Fill in, at a minimum, the mandatory fields in this form.
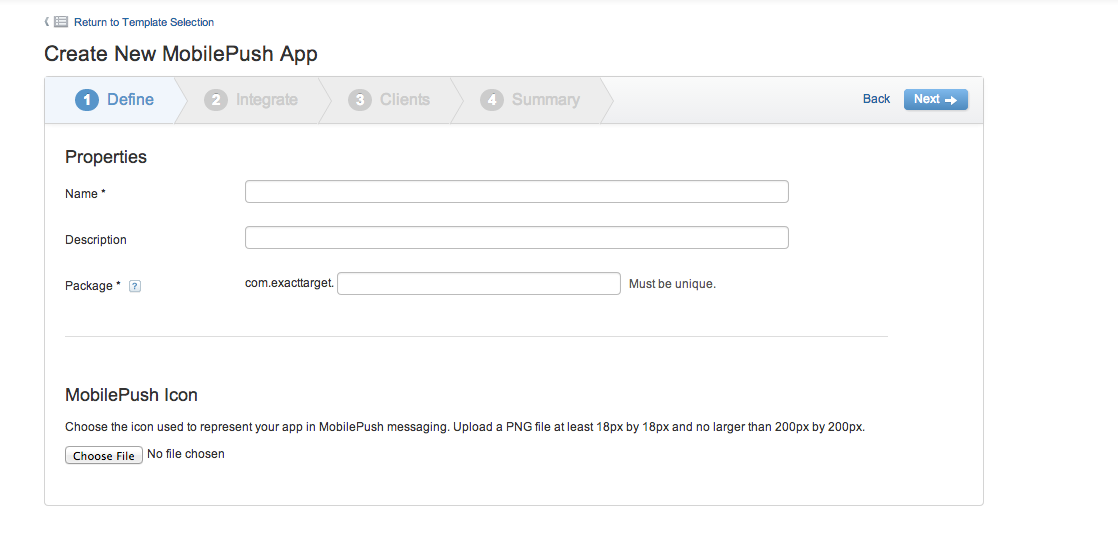
Depending on your setup, repeat this process if you plan on using different instances for production and development.
Note the following about the required fields:
The Name can be anything you choose.
The Package has no correlation to anything outside of the MarketingCloud ecosystem and can be any unique identifier for your application.
The Description & MobilePush Icon fields are optional but will help you identify your application within your Marketing Cloud account.
Click Next in order to integrate this new app with your Marketing Cloud account.
Integrate App Center app
The MobilePush app created in the App Center must be connected to a specific Marketing Cloud account. You must have a login for your Marketing Cloud account in order to connect this MobilePush app to the correct Marketing Cloud account.
Follow these steps in order to connect this MobilePush app to the correct Marketing Cloud account:
-
Select an account (or New…) in the Account drop-down.
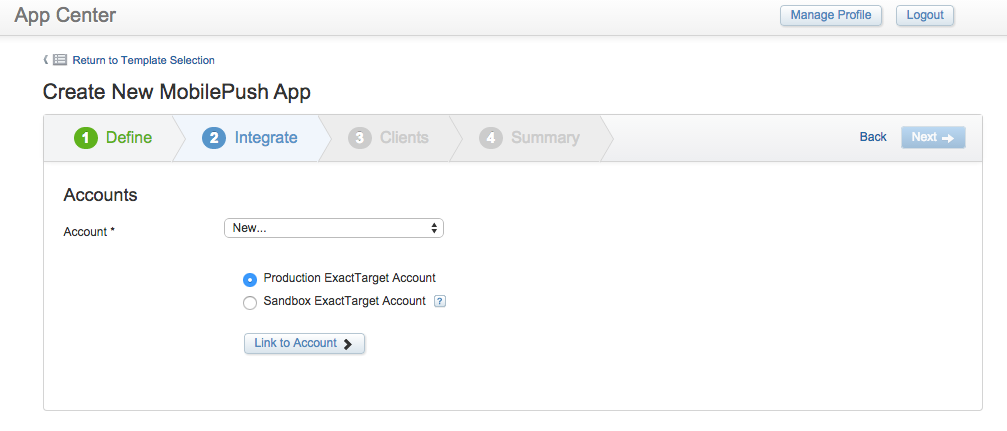
Select the Production ExactTarget Account button unless otherwise instructed by your Salesforce Marketing Cloud relationship manager.
-
Click Link to Account.
A popup window (pictured below) will appear.
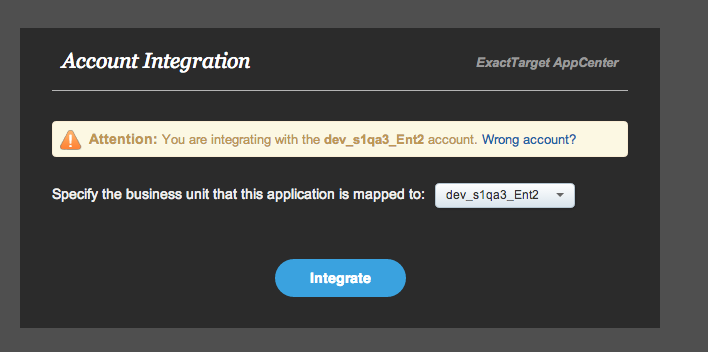
In an Enterprise 2.0 account, ensure that you select the correct business unit for your app integration.
Click Integrate.
In the APNS Client section, click Choose File and upload the APNS certificate provided when you created your app in the iOS Dev Center.
-
Type in the APNS certificate password in the Password field.

When you have all the fields required for your application’s platform(s) populated, click Next.
-
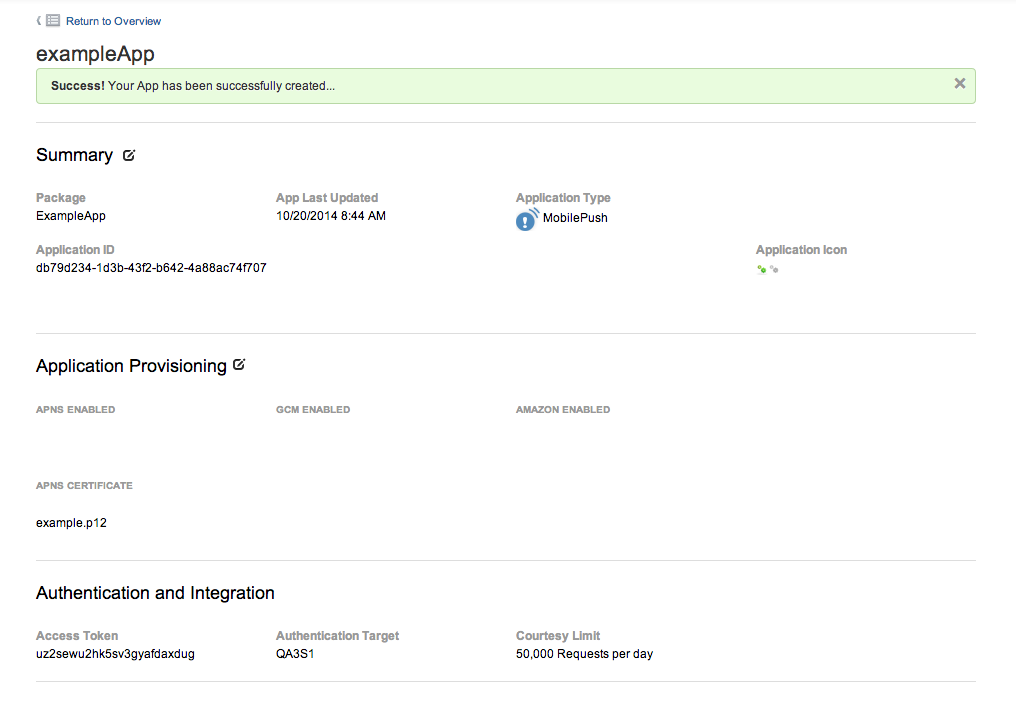
Review the information you provided and check for any potential errors and click Finish.
You should be presented with a Success! message and an application details screen. Any of the areas can be edited by clicking the edit icon associated with the Summary or Application Provisioning sections.
Implementing the SDK Push Notifications
AppDelegate+ETPushConstants.m
The SDK can now be configured with the App ID and Access Token, as explained in the About section. Update kETAppID_Prod and kETAccessToken_Prod with their respective values.
AppDelegate+ETPush.m
The boolean parameters withAnalytics, andLocationServices, andCloudPages and withPIAnalytics enable certain functionalities of the SDK, however, they are not required for the push notifications themselves to function which will still be sent even if all are set to NO.
successful = [[ETPush pushManager] configureSDKWithAppID:kETAppID_Debug         // set the Debug ID
                                          andAccessToken:kETAccessToken_Debug   // set the Debug Access Token
                                           withAnalytics:NO
                                     andLocationServices:NO                     // set geoLocation
                                           andCloudPages:NO
                                         withPIAnalytics:NO
                                                   error:&error];
If the configuration is successful and returns YES, the push notifications are registered.
UIUserNotificationSettings *settings = [UIUserNotificationSettings settingsForTypes:
                                        UIUserNotificationTypeBadge |
                                        UIUserNotificationTypeSound |
                                        UIUserNotificationTypeAlert
                                                                         categories:nil];

[[ETPush pushManager] registerUserNotificationSettings:settings];
[[ETPush pushManager] registerForRemoteNotifications];
…
[[ETPush pushManager] applicationLaunchedWithOptions:launchOptions];
If the configuration is unsuccessful an error message is shown:
dispatch_async(dispatch_get_main_queue(), ^{
    /**
     Something has failed in the configureSDKWithAppID call - show error message
     */
    [[[UIAlertView alloc] initWithTitle:NSLocalizedString(@"Failed configureSDKWithAppID!", @"Failed configureSDKWithAppID!")
                                message:[error localizedDescription]
                                elegate:nil
                      cancelButtonTitle:NSLocalizedString(@"OK", @"OK")
                      otherButtonTitles:nil] show];
});
Check the error object for detailed failure info. See file PushConstants.h for codes.
Subscriber Key Implementation
To update the subscriber key, you should create a feature for the user to introduce a value, and then set this new value in the pushManager.
MCSubscribeKeyViewController.m
To get the subscriber key, use the following snippet (you can assign this value to any variable):
self.subscriberKey.text = [[ETPush pushManager] getSubscriberKey];To set the subscriber key, use the following snippet (substitute self.subscriberKey.text with the appropriate value):
[[ETPush pushManager] setSubscriberKey:self.subscriberKey.text];Tag Implementation
To implement contact segmentation by tags, include code to set tags for subscriptions as defined by user choice.
MCTagsViewController.m
To add a tag:
[[ETPush pushManager] addTag:@"tag"];To remove a tag:
[[ETPush pushManager] removeTag:@"tag"];To get all the tags:
[[ETPush pushManager] allTags];Beacon and Geofence Message Implementation
AppDelegate+ETPush.m
To implement location services, pass a YES value for the andLocationServices parameter and use ETLocationManager to monitor location and geofence for a user.
successful = [[ETPush pushManager] configureSDKWithAppID:kETAppID_Debug         // set the Debug ID
                                          andAccessToken:kETAccessToken_Debug   // set the Debug Access Token
                                           withAnalytics:NO
                                     andLocationServices:YES                    // set geoLocation
                                           andCloudPages:NO
                                         withPIAnalytics:NO
                                                   error:&error];
Make sure you also add the "NSLocationAlwaysUsageDescription" key to your application’s *.plist file. See docs: NSLocationAlwaysUsageDescription and NSLocationUsageDescription.
After push notifications are registered, start watching locations to retrieve the fence and location notifications from ET Geofences and Beacons:
/**
 Start geoLocation
 */
[[ETLocationManager locationManager]startWatchingLocation];

/**
 Begins fence retrieval from ET of Geofences.
 */
[ETRegion retrieveGeofencesFromET];

/**
 Begins fence retrieval from ET of Beacons.
 */
[ETRegion retrieveProximityFromET];
When the application enters background mode, Location Services are disabled through the MobilePush SDK.
- (void)applicationDidEnterBackground:(UIApplication *)application {
    /**
     Use this method to disable Location Services through the MobilePush SDK.
     */
    [[ETLocationManager locationManager]stopWatchingLocation];
}
When the application becomes active, Location Services are initiated through the MobilePush SDK.
- (void)applicationDidBecomeActive:(UIApplication *)application {
    /**
     Use this method to initiate Location Services through the MobilePush SDK.
     */
    [[ETLocationManager locationManager]startWatchingLocation];
}
MCGeoLocationViewController.m
To check if locations are active, use the boolean method:
[[ETLocationManager locationManager]getWatchingLocation]If locations are active it returns YES, otherwise it returns NO.
To obtain the monitored regions use this method:
[[ETLocationManager locationManager] monitoredRegions]Implement Analytics in your Mobile App
AppDelegate+ETPush.m
In the call to configureSDKWithAppID, pass a YES value for the withAnalytics parameter.
successful = [[ETPush pushManager] configureSDKWithAppID:kETAppID_Debug         // set the Debug ID
                                          andAccessToken:kETAccessToken_Debug   // set the Debug Access Token
                                           withAnalytics:YES                    //
                                     andLocationServices:YES                    // set geoLocation
                                           andCloudPages:NO                     //
                                         withPIAnalytics:NO
                                                   error:&error];
To see your new Web and Mobile Analytics, open the Web and Mobile Analytics app within the Marketing Cloud and agree to the Terms and Conditions to get started.
